Project: Sump Thing is Wrong Here
Duration: 3-4 Hours
Actual Time: 1 Week
Costs: Around 200.00$
Canada Housing and Mortgage has a great write up on this.
The Problem(s)
As me and wife stood looking over our sump pump pit and watched water coming in and being pumped out. I looked over and said, "If we had a power failure, how long would it take for our basement to turn into a pool?" she said, "I don't know...30 minutes."
Now let's not jump the gun here. For sure there is a system put in place to handle this. Right? Sure the alarm system would page me and let me know that there is a power failure. Next it would page me and let me know that the sump pit is about to overflow. Grrreaaaat... This is one of those things where failure is not an option!
The Solution
Ok so we can get a backup battery systems for 500$. We can power the pump with batteries. True this will work for awhile. How long will that last? Plus you still only have one pump. Motor failure? There is another option. Cheaper and maybe better. Ask yorself a question. What is the one thing you will not loose during a storm? Municipal water pressure! There are pumps on the market that will run and use the municipal water pressure to pump water. This is a perfect solution for a sump pump backup problem.
There is a company in Quebec called Burcam. They manufacture a pump that does just this called "sump buddy". Our project will be to buy and install one. This is a pump that sits next to your primay pump and acts as a backup pump in case of a power failure, or pump problem. It will have to be intergraded into your exsisting system. Check your manuals and find out what the prerequisites are before you buy. This pump is pretty simple to install and can be intergraded in most systems. As you can see from below, We have some work to do.
What is wrong with this picture? There is dirt and rocks at the bottom. The pump float switch is too close to the drain. Enough water coming in can force the float down not allowing the pump to start. How can I work on it without cutting into the abs ejector pipeline? Cha-Ching!
What do we need?
1) "T" for the second pump on the 1 1/2 abs outlet.
2) Check valves on both pumps, so the water pressure from the pump does not bleed out of the other pump.
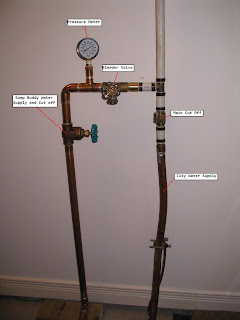
3) 3/4 inche water line brough to new pump. Copper tubing. Valves, 45's 90's, and fittings.
Extras?
1) I want to be able to remove the pump without having to cut the abs tubing.
2) I want to be able to drain the entire house water supply into the sump pit. If I ever need to work on the plumbing. This is the lowest point.
3) GFI Circuit for the primay would be nice.
4) Water pressure indicator.
Pump Installed, tested, working, no leaks and ready for action.
As you can see from the photos the entire place has PEX tubing. I had to use copper because I need something strong to hold down the Sump Buddy switch. PEX will not hold it steady. There is a manual that did come with the pump, Read it, understand it. Do it. Make sure you have everything you need to complete the job before you start. Do not do this while stores are closed. In case you need to buy something you did not foresee. Understand you are working on a device that pumps water out of your house when it rains. If this is done wrong it will flood your basement. If you start working on this make sure you can finish it.
Things to watchout for:
- You are playing around water and electricity, Cut the breaker.
- Make sure the primary pump is able to work without any help from the backup pump. The water level trip off for it must not fall into the operating range of the backup pump. Only after a power failure will the water level go above it and into the zone of the backup pump. Once in that zone the backup pump must start working.
- Whatever you do, make sure that both pumps DO NOT start at the same time. Big no, no! Even for testing. This could damage the pumps.
- Make sure both pump have check valves.
- Make sure your backup pump water supply also has a check valve, We do not want to mix sump water back into the supply line. (sump buddy did come with this)
- The Sump Buddy does come with it's own check valves, The top part looks like it connects to a flexable hose. You can cut it off and fit it to a 1 1/2 abs. Make sure you cut it before the reducer.
- Do not allow the water level of the backup pump to reach over the drainage pipe.
The final step would be to test the entire system. Get yourself a hose and start pumping water into the pit. Allow the primary pump start up and drain. The backup pump should NOT have started. As the pit is filling up a second time and the primary is just about to start, pull the wall plug, similating a power failure. The water level should over pass the primary range and fall into the backup. The backup pump should startup at this point. Getting it just right will be tricky. Give yourself 3 or 4 inches of play between zones. If the water is reaching the french drain the level is to high.


